
Mailing & production
Upload a document, check it, and submit
Upload a finished letter, line the address up with the envelope window, split a multi-letter file if you need to, then submit only when the draft says it is ready.
Last reviewed · By Intelliprint Team
Use this route when you already have a finished letter, or a PDF containing several mail-merged letters.
Select the upload route
- Select New print or Start a print.
- Choose Upload a PDF.
- In Upload a Letter, select browse files, choose your file and confirm. Or drag the file into the upload area.
- Wait for the draft print screen to open.
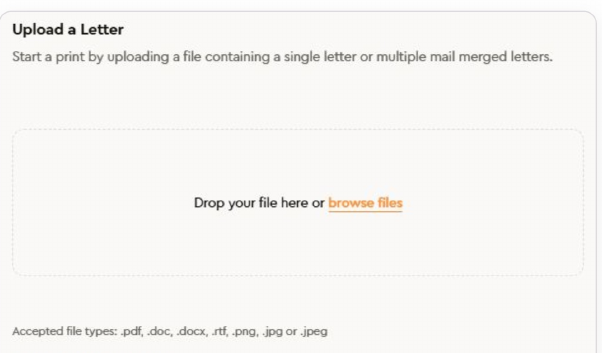
Accepted file types: .pdf, .doc, .docx, .rtf, .png, .jpg and .jpeg.
For a print-ready document, use the finished PDF. Check the content, page order and addresses in the original before you upload it. Download letter template gives you a starting document. After uploading, always check the preview before sending.
Check the preview and address
Check the file name or reference at the top of the draft. Then check the recipient details below the preview, the letter count and the cost shown. Use the zoom controls to look at the document closely.
The recipient address should sit inside the envelope window. If it sits outside the window, use the four arrows to move the document in 1 mm steps. Wait for the preview to update after each move. Reset puts it back where it started.

If your document has no address for the window, select Add address sheet. Enter the name, address, postcode and country, then select Add address sheet in the form. This adds a new addressed page at the start of that letter, so check the new page count and cost.
The preview is a guide only. The full document is rendered at print time, so check your original document too. If the preview is blank, use Refresh preview or Open in new tab, and sort out the problem before you submit.
Window measurements and other upload problems are in fixing PDF address and upload issues.
Split a file that holds several letters
Select Split into letters, choose a method, fill in its settings and select Save splitting.
- None, one letter — for a single recipient.
- Split by number of pages — when every letter has the same page count.
- Split by phrase presence — when a phrase marks the start of each letter.
Remove letters with phrase is optional. Use it to skip pages such as "EMAIL ONLY".
Then check the letter count and each letter. Use the recipient list or letter navigation, and make sure no pages have gone to the wrong recipient.
Add the same documents to every letter
Open Add supporting documents, then Add files. You can add several .pdf, .doc, .docx or .rtf files, reorder them and remove them. Their pages are added to the end of every letter.
Turn on Apply letterhead to these documents only if your chosen letterhead should also sit behind these pages. Select Save changes, then check the page order, letter count and cost again.
Backgrounds are covered in letterheads and extra documents.
Choose the document settings
Use Letterhead — first page and Letterhead — other pages to pick saved backgrounds. Leave them as None if your document already includes your branding. Only choose an Insert if you need one. The Insert control appears when the account has inserts.
Check Double sided and Premium print. Double sided needs at least two pages, so it is not available for a one-page letter. Choose Mixed when only some page ranges should be double sided, and enter ranges such as 1-2, 4-10. Premium print is high-quality laser printing for important presentations. In a bulk draft, these settings apply to every letter.
Set postage and delivery
Choose a Service and Envelope. If your pages will not fit, the envelope is upgraded for you. Leave Mail date blank for the next available date, or schedule up to one month ahead. Read any cut-off message on screen.
Service options are in choosing a postage service. Date rules are in scheduling a mailing.
Check the advanced settings
- Email confirmation — sends you an email when the print is submitted.
- Confidential — hides the document from other users on the dashboard.
Only submit after a final check
Check the recipients, address positions, page order, print options, postage, mail date and total including VAT.
Ready to send means the draft is prepared. It does not mean the job has been posted.
Only click Send to print when you mean to submit. Follow any review or approval prompts, then check the status in Mail, then Print History. Not ready? Leave the draft unsent and reopen it later from Home or Print History.